February 10, 2014

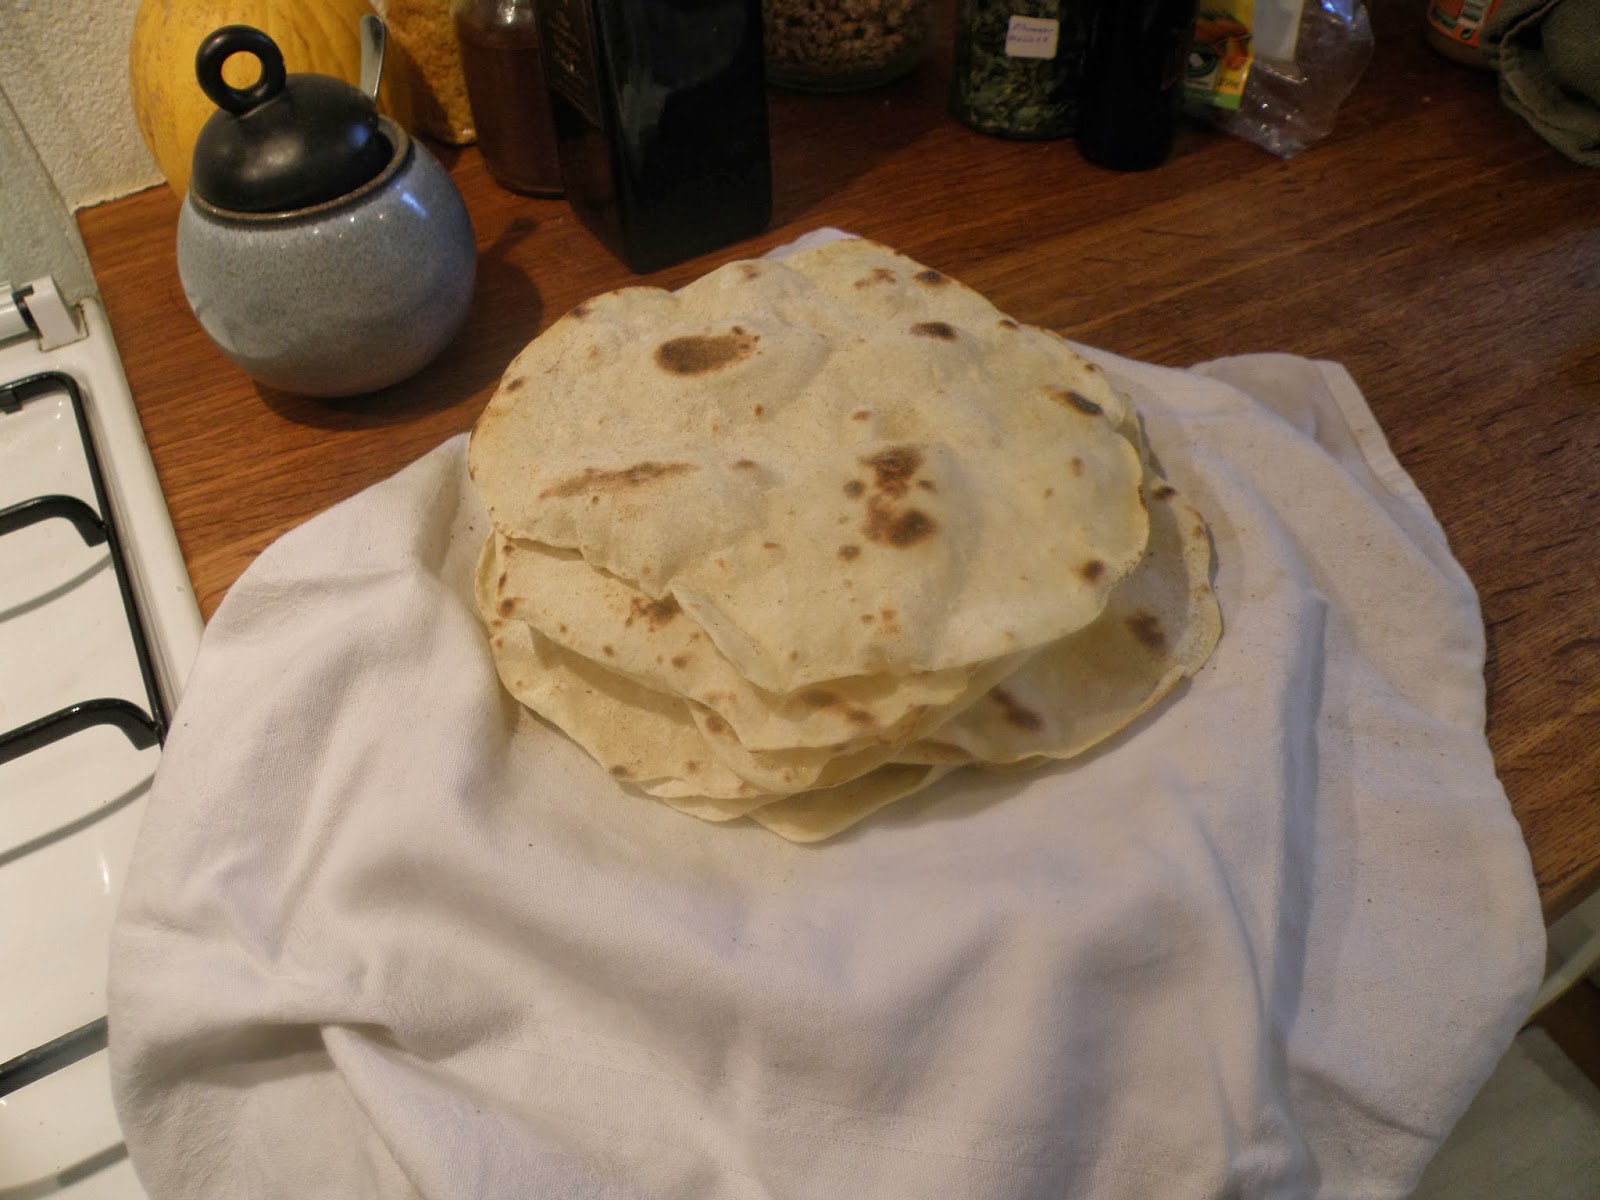
Homemade flour tortillas!


I had to put an exclamation point in the title because these are homemade flour tortillas! Which means you can make them at home and use them for tacos or burritos, eat them with fajitas, make them into flour tortilla chips or roll them up warm with butter, cinnamon and sugar for a snack! They make a mean tortilla chip, too.


And, even better, you can do all of that even if you live in a country (or state) that suffers from a serious lack of decent tortillas.


I'm from California where all you have to do is go outside, get yourself to a store or farmer's market and, before you know it, ta da! you're home again with a nice stack of soft flour tortillas at a (often very) decent price. So it was a pretty heavy blow when I moved here and realized that the flour tortillas you find in the stores in Munich are heavy, gummy and all-around pretty ick.


After years of weighing down my suitcases with mounds of tortillas and other food products, I finally sat down and looked up homemade tortillas online. Duh! What took me so long?


These tortillas are light and fluffy and taste really, really good. My favorite thing to do is to eat the first one out of the pan with a little butter while I finish making the rest. And, although it does take a little bit of time to roll them out, these tortillas are incredibly simple to make. 5 ingredients, rolling pin and a very hot pan. That's all you need.


Homemade flour tortillas!
Adapted ever so slightly from Homesick Texan


2 cups flour

1 1/2 teaspoons baking powder

1 teaspoon salt

2 teaspoons olive oil (The original recipe calls for vegetable oil. I always have olive oil handy and find it gives the tortillas a bit more depth, but you can use vegetable oil instead.)

3/4 cups warm milk


Combine flour, baking powder, salt and oil. Add the warm milk, pouring it in slowly and stirring between each pour. Stir or combine with your hands until the mixture forms a loose, sticky ball.
Knead for two minutes on a floured surface until the dough is firm and soft. (You might need to keep adding a bit more flour to the floured surface as you go. The dough seems to suck it right up.)

Place the dough in a ball and cover with a damp cloth. Let sit for 20 minutes.

Break off small sections of the dough - I usually golf ball-sized chunks - and form them into small dough balls. Golf ball-sized chunks will give you around 12 tortillas, but you can make them smaller (for tacos) or larger (for really big burritos). Place these on a plate and cover for another 10 minutes. Make sure they aren't touching.

At this point you can actually let the dough rest for 30-40 minutes if you have an errand to run or get distracted.

On a floured surface, pat a dough ball into a circle and roll it with a rolling pin from the center until it's thin and about 6-8 inches in diameter (very much like rolling out a pie crust). Keep the rolled-out tortillas covered until ready to cook.

Heat your skillet (preferable an iron skillet) on high and cook the tortilla about 30 seconds on each side. It will start to puff up (on both sides) when it is down. Keep the tortillas covered in a clean kitchen towel or napkin until ready to eat. You can reheat them in the skillet, over the flame on a gas-burner stove or in the over wrapped in tinfoil.

Store leftovers tightly wrapped in a damp towel in the fridge for up to 2 days.


January 14, 2014

And suddenly it was 2014...

It's been a while. I was over here and then I wasn't really anywhere. And now that it's a new year and time has passed and I've had plenty of time to cook and, even more, to eat, I realize that I miss this space. It's time to start again. He would want it that way.


Plus, there's still this guy…


Sooooo….. I've decided to dedicate Cooking with Laughter to more everyday recipes. You know, simple food that is easy to make and that you find yourself eating again and again. While this space over here will be dedicated to more intricate, involved dishes that take a bit more time and effort but leave you glowing with satisfaction. Or can at least be ticked off your "ok, now I've done that" list. I'll be sure to cross reference the two sites so you don't miss a thing! And I promise this will be last post that does not include pictures of food.

I'm looking forward to some new adventures! Happy New Year!

July 19, 2011

Changes...


Kitties come and go, things change and I feel like it's time to move onto a new space that will be something of a new start where I can devote myself to new cooking projects without the ups and downs of the last two years. Laughter, you will always be in my heart. And with that said, here's the new link...

April 15, 2011

Wild leeks (Bärlauch)

(Note to the reader: Before you go out harvesting your own wild leeks, please read the last paragraph of this article with some tips on how to do it sustainably)

When I first moved to Munich one of my favorite things to do was to go for walks in the English Garden. I moved here in spring and immediately noticed a distinctive yet elusive scent. It was distinctive in that it was earthy but pungent at the same time with a hint of something oniony and warm. It was elusive in that I had no idea what it was or where it came from. Christian didn't know either. And so it went - for years. My brain made a direct connection between Munich and that smell. To me it became the scent of Munich. And then, one day not long after the "Bärlauch"craze had taken off full throttle in the city - the herb seemed to be popping up in every dish known to man - I went for a walk through the park and finally made the connection. Bärlauch! That was what I had been smelling and searching for all this time. And it was everywhere. Long, shiny green leaves springing up in patches around trees, one of the first signs of spring's arrival and increasing in olfactory intensity throughout the summer.

I went home and looked it up right away. I hadn't yet taken the time to find the English equivalent of Bärlauch and, in no time, I had it - wild leeks, known to many as ramps.


Now a few years or so before my big wild leek discovery I had read "Sarah" by JT Leroy (Laura Albert), which includes some not-so-nice, lengthy descriptions of ramps and what they do to your digestion and to your breath. So my first thought was to proceed with caution. But then I thought, how bad could it really be, especially with the herb flooding every cafe within a 20 mile radius. I hadn't heard a single complaint. And so I dove in. It was beautiful. Garlicky without being overwhelming and, for reasons I still do not understand, not lingering over to the next day. In other words, no morning-after garlic breath.


People interested in food and in trying "new" ingredients have been using wild leeks every spring for sometime as have those who cook locally in many parts of the world (where the herb has been in use for much longer). Perhaps one of the easiest ways to prepare and store the wild leek is to make pesto. Another benefit of making pesto is that you only need the leaves, which means you can leave the bulb in the ground where it will sprout again next spring. The decimation of the wild leek population has begun to be a problem in some places because of its newly found popularity and the fact that a lot of people pull up the whole plant, roots and all, when harvesting. Of course, the bulbs are delicious, too, and are brilliant company with eggs or sauteed in butter and tossed with pasta, but if you are going to harvest the bulbs don't harvest too many and make sure to snap off the roots and put them back into the ground. It will take a few years, but those roots will grow a whole new plant. Save the wild leek!


Bärlauch (wild leek) pesto

One bunch of wild leek leaves. Or more. The more you harvest or purchase, the more pesto you can make. Just remember: A little goes a long way, so don't make too much unless you are planning on storing it.

Olive oil , enough to make everything meld together plus some extra to put on top

Finely grated parmesan cheese, about a handful depending on how many wild leek leaves you have and how big your hands are

Pine nuts, 20 - 30 or to taste

Now, there are three ways to do this. Let's start with the easiest.

Chop the wild leek leaves into small pieces. Plop everything into a food processor and mix until fine. Voila!


Option 2:

Tear or chop the leaves into small pieces and use a mortar and pestle to pound them into a paste. Add some parmesan, pine nuts and oil and pound until everything is small and combined. Depending on the size of your mortar, you may have to do this in batches. This method takes longer, but the result is more rustic and, I think, more flavorful. Maybe it's the elbow greece?

Option 3 (for those of you without a food processor or a mortar and pestle):

Chop up the pine nuts and wild leek leaves until very fine. Combine with the cheese and olive oil. Stir well.

Enjoy over pasta, slathered on roast chicken or on top of a soup for extra flavor and a subtle kick.

If you want to save your pesto for later, put the pesto in a jar and pour a layer of olive oil about as thick as your finger over it and screw on the cap. Keep it in the fridge for a week or so or freeze it (an ice cube tray for portion-sized storage) for up to 6 months.

One more side note: If you do decide to harvest your own wild food make sure that you go with someone who knows what they are doing and bring a good field guide with you so that you don't confuse the plant you are looking for with a dangerous cousin.

April 4, 2011

Cherry winter/spring

Now that spring is in full throttle, not to be denied or made to go back under that sleepy winter blanket, it is hard to look back at the coziness (and cold) of winter and feel any sort of warm glow inside. I am chomping at the bit for fresh baby vegetables from the garden and the bbq! Still, a few weeks ago things were not quite so far along and our almond tree, which now looks like this


looked like this


(As you can see in the first shot, it's raining today, which I why I did not go looking for wild leeks and did not make the pesto recipe that I am looking forward to sharing with you. But hey, all the more to look forward to, right?)

And in the fever of wanting, wanting, wanting spring and warmer weather I remembered that I still had a bag of cherries sitting in the back of my freezer that I halved, pitted and flash froze last summer. I knew I had to act fast. It would not do to have those cherries still around when the real competition came back on stage - fresh beats frozen any old day and I had saved those cherries so that I could have a burst of summer flavor in the depths of winter. So I thought and rummaged and came up with a plan. A sweet and simple plan, perfect to accompany a cup of tea on a raining spring day (like this one).

I structured my plan around the recipe for french-style yoghurt cake that was posted on Orangette way back and that I find myself turning to time and again for its simplicity and also because when I make it I can actually just use the yoghurt container, which makes me feel quirky and old-fashioned in a good way. Of course, you need to buy your yoghurt in a plastic container or jar that holds about 1/2 a cup but it's worth any possible extra effort involved because aside from feeling quirky and trendily old-fashioned, you'll also have the feeling that you really know what you're doing, you know, no measuring cups!

Of course the cherries gave the cake that little something extra. And in the process of measuring


and mixing


I realized that frozen cherries are incredibly delicious. I might even have to freeze up a bunch this summer and make some sort of slushy treat instead of waiting again until winter has come and gone to enjoy the bounty.


I only made a few minor adjustments to the Orangette recipe. I added the cherries, of course, and a pinch or two of salt (I like my sweets a little salty). I also reduced the amount of sugar slightly and used vegetable oil instead of canola oil. And I left out the glaze because I didn't want anything interfering with the cherries. But feel free to add it, if you want. You will find the recipe for it in the original post.

I have a habit of making cakes in miniature pans like the one above. There are only two of us and, although it may be hard to believe, there really is only so much cake two people can eat. With the smaller cake pans I can put one out to eat right away and freeze the others for later on in the week or to bring along on a spontaneous visit to a friend.


So here's the recipe. Enjoy!


Yoghurt cake with summer cherries (for winter!)
Slightly adapted from the recipe posted on Orangette


(again 1 jar equals about 1/2 cup)

1 jar plain yogurt, whole milk (I know, I know, but whole milk yogurt is soooo much better, especially when you bake)

1 3/4 jars sugar

3 large eggs

3 jars unbleached all-purpose flour

2 tsp. baking powder

a pinch of salt

1 jar vegetable oil

optional:
2 tsp grated lemon zest (you could substitute the lemon zest for orange zest if you want a cherry-orange cake. With toasted almond slivers or pecans on top....)

About 15 to 20 halved and pitted cherries, frozen, depending on how cherry you want it. (That will give you 30-40 cherry halves).

Preheat oven to 350º Fahrenheit (180º Celsius)

In a large bowl combine the yogurt, eggs and sugar and stir until well blended. Add the flour, baking powder and lemon zest, if using. Combine. Now comes the odd part. Add the oil. It won't stir in right away and will look like a gloppy mess but keep stirring and it will blend in eventually. Pour about half the batter into a buttered 9-inch round cake pan or divide half of the batter between 4 4-inch cake pans. Place half of the frozen cherry halves cut-side down on the batter. Don't worry, they will sink a bit. Add the rest of the batter, dividing in among the pans if you are using more than one. Put the pan or pans in the oven and bake for about 10 minutes until the cake has just started to set. Carefully plop the remaining cherries, cut side down, on top of the cake in a pretty pattern of your choice. Slide the cake back into the oven and continue baking for another 10-15 minutes or until toothpick stuck into the center of the cake comes out clean. I've found that the cakes take a little longer to bake because of the fruit.

Let the cakes cool on a rack. I find it best to remove them from the pan after about 15 minutes and then let them continue to cool completely. They tend to slide out easier when they are still warm.


December 25, 2010

Christmas wishes


Merry Christmas from our kitchen (and home) to yours. I hope it is warm and cozy wherever you are...

December 11, 2010

Pork exquisite

We've had our first snow here, but a thaw set in a few days ago and it almost feels like spring outside. So, before the winter sets in for good, I wanted to do a post about the trip to Edinburgh I took in late fall and especially about something beautiful I discovered while I was there. Yes, we took long walks through the city and even longer ones through the park


and along the coast.


We even visited the farmer's market near the castle


And it was all beautiful.

But there was something else, something that took my breath away in a primal part of my being that seems to have awakened in me since moving to Munich, the city of beer and pork. Something that calls me back to Edinburgh because I have to have it again. And again. And (hopefully) again.

And that something was Oink.


Now, Oinks may be small, it may be simple, but it is absolutely spectacular and, even though you might miss it if you walk past it on your way to the city center, overwhelmed by all the other sights and sounds, once you know it is there you will never miss it again. And why not?, you ask. Because. Of. The. Pig.


Yep, that is what you think it is. A spit-roasted pig in a display window. With knives sticking out of it for easy access. And beautiful skin that folks in Edinburgh call "crackling" and people in Bavaria refer to as the "Schwarte." Since I had never eaten it before coming to Munich, I'm really not sure what it is called in the States or even if it is called anything at all. It is basically pure, crisp, golden, salty fat. Delicious. And somehow, I am absolutely positive, good for you.


On a soft, squishy roll with sage and onion stuffing or haggis and a choice of spicy or sweet relishes (I opted for the sage and onion, C. opted out and stuck with the spicy relish), it was absolutely heavenly and C. and I enjoyed every last bite. So, if you're ever in Edingburgh, check it out. Once you know it's there, it's very, very hard to miss.


Here's the address in case you need a little help:

Oink Hog Roast Shop
34 Victoria Street
Edinburgh, EH1 2JW

(right up the hill from Grass Market as you head toward the Royal Mile)

December 7, 2010

Sauce

I used to make tomato sauce in college - easy to use in pizza, lasagna or on pasta, all three of these being carbohydrate staples, which, along with the more vegetable-friendly stir fry, were what I seemed to subsist on in 4 different cities and 2 different states until I got my degree. But I realize now that the sauce I made back then lacked refinement and finesse. There was nothing subtle in that sauce, no "hint" of anything - just roughly chopped onions and garlic cooked in olive oil and then tomatoes and herbs to top it off. Back then a long, slow simmer meant 10 minutes max on medium heat.


                      This is the new school sauce, not the old one


But now that I and my taste buds have matured somewhat, I realize that there is more to a tomato sauce than that. That it can be a luxurious creature and still not take up much of your time. That tomato sauce holds secret and mystery in its silk and that subtle flavors can be coaxed into and out of the sauce with ease. And that these subtleties form a luscious base for so many foods, far beyond the pasta, pizza, lasagna creations of my younger days. But of course, tonight, I want it straight and simple. Give me spaghetti, please, and a sprinkle of parmesan.


One thing I have noticed, though, that really elevates the flavor of this sauce for me are herbs that I use either fresh or have harvested and dried myself. It's a hobby of mine in the spring, summer and fall - harvesting herbs from my garden and the countryside/woodlands around Munich to dry and use over the winter in tea, in soups and stews, with meat and vegetables and, of course, in sauce. They have a power and a punch that you just don't find in store-bought dried herbs that have been sitting around for a while. Of course, the store-bought variety are also fine to use in a bind - which is what I did tonight when I realized I didn't have any basil. All the herbs I used in this sauce were dried except for the rosemary, which seems to have survived the first snow intact. Try using larger amounts of fresh herb if it strikes your fancy. I especially like the brighter taste of them in the sun on the patio in the summertime.


                                 A few herbs for winter days


Sauce
(originally inspired by the beautiful blog Orangette and adapted there from Essentials of Classic Italian Cooking by Marcella Hazan)


2 cans of whole, peeled tomatoes
3-4 cloves of garlic
2 small onions, peeled and halved
3 Tbs. unsalted butter
2 Tbs. extra-virgin olive oil
2 tsp. each of dried thyme, sage and basil (use 2 1/2 - 3 tsp if using the fresh herb)
1 tsp dried rosemary
salt


Put the tomatoes with their juices into a large sauce pan or dutch oven together with the onions, garlic, butter, olive oil, herbs and a few pinches of salt. Give it a stir and get the lot simmering. Simmer, covered, for 45 minutes. For a thicker sauce, simmer without the lid on for the last 10 minutes or so. Remove the onions with a slotted spoon - press them against the side as you remove them to get out all the flavor or leave them whole and chop them up to add to whatever meat or vegetable you are going to eat with the sauce. Taste for salt. I won't give any specific amounts here because every tomato is different as is everyone who eats tomatoes. If it seems a bit too acidic, add a sprinkle or two of sugar. Once you have gotten the sauce to your liking, squish the tomatoes down with the back of a wooden (or other handy) spoon (a slotted spoon works nicely for this, too) for a chunky, crushed tomato effect or blend in a food processor or hand mixer for a smoother, silkier sauce. Ladle away and enjoy!
As I said, this sauce is extremely versatile. You can leave out the herbs for a softer, more subtle flavor or play with the mix if you prefer the taste of basil, say, to rosemary. You can also add a few red pepper flakes for a punch (think penne al arrabiata) or mix it with roasted veggies or beef for a primavera or bolognese effect.

November 30, 2010

The bird that keeps on giving

I have learned two things over the past few months (ok, at least two relevant things):

1)   I am definitely a cold weather blogger:
    

                                            is that.... snow?!
and

2)   Sometimes you just have to post a recipe after the big event has passed

Case in point - today I am going to give you a turkey recipe almost one whole week after Thanksgiving and almost two whole weeks after I actually celebrated the holiday here in Germany - since it isn't an official holiday over here you can be flexible about these things, you know.

But... this turkey technique will knock your socks off. That was definitely the effect it had on the 11 and 3/4 people we had over for dinner (11 adults, a 3 year old and a six-month-old baby). It's called dry brining and will make your bird incredibly juicy and tender with only about 2 1/2 hours cooking time!

              Our bird and, um, some slight problems with carving space...

Can it really be true?, you ask. Yes, it can. And if trust is not your forte, well, you might just have to make this turkey for Christmas this year and see for yourself! Or even this weekend for that matter. After all, turkey really is the bird that keeps on giving - turkey sandwiches, turkey soup, turkey quesadillas, turkey pot pie... turkey is a very effective way to feed a small army without a ton of extra work - at least with this recipe... I discovered it in the issue of fine cooking magazine that I bought at the airport to keep me entertained on my last 11 hour flight from LA to Munich. Truly incredible (the recipe, not the flight, although it wasn't bad either, as far as overseas flights go). Give it a shot and let me know how it turns out.

One word of caution however - this is a DO-AHEAD recipe! The turkey needs to soak up the dry brine for at least 24 hours, if you have 3 or 4 days, even better!


P.S. You should be seeing more posts on this site now that winter seems to have settled in.


Dry brined roasted turkey with fresh herbs
(adapted somewhat from the Oct/Nov 2010 issue of fine cooking magazine)

DO NOT BE DAUNTED by the lengthy descriptions here. They are purely for the sake of explanation. The actual doing it part goes really fast.

This recipe is for a 16-lb. turkey. Our turkey weighed in at almost 18 lbs., which was fine because you can adjust the salt brine by using 18 oz. of salt per pound. Also, you can increase the amount of herbs you use, just be careful not to overdo it too much. If you decide to up the amount of herbs, add a little more olive oil to keep the mixture spreadable.

Serves 8 - 10 with PLENTY of leftovers

2 Tbs.          fresh thyme, chopped
2 Tbs.          fresh sage, chopped
2 1/2 tsp.    fresh rosemary, chopped
1 Tbs.          extra-virgin olive oil
1 16-lb.        turkey, as fresh as you can get it
2 oz.            sea salt or kosher salt

(The recipe calls for kosher salt and if you have it, use it. I couldn't get my hands on any so I used sea salt instead, but I read that kosher salt is the perfect kind of salt to use in this kind of preparation, so if you can get it, it's worth the effort! If you do use kosher salt and do not have a scale, use 1/2 cups if using Diamond Crystal and 1/4 cups if using Morton)

STEP 1: The herbs

Rinse out your turkey and pat it dry. Mix the herbs and oil in a small bowl. Carefully slide your hand underneath the turkey's skin (between the meat and skin) and loosen it from the breast, thighs and drumsticks. Rub the herb mixture on the meat underneath the skin Make sure you get it in there! When you are done, pat the skin back into place. It will look lumpy and green is spots, but that is ok.

STEP 2: Dry brine the turkey

Rub the salt inside the cavity and on the skin. Make sure you use up ALL of the salt, even if it seems like a lot. Don't worry, your turkey will not be salty! Put the turkey in a large food-safe plastic bag (like a roasting bag) and then double-bag it. Refrigerate the turkey for 3 days, turning it over every day. If you don't have that much time you can shorten this last part, but try to leave your bird in the brine for at least 24 hours, turning it once after the first 12 hours.

STEP 3: Let the bird rest

On the evening of the 3rd day (sounds biblical, doesn't it?), remove the turkey from the bag and pat dry. If you are planning to stuff the bird, you might want to give the cavity a quick rinse at this point and then pat it dry as well. Put the turkey in your roasting pan and plop the whole thing back into the refrigerator, unwrapped, so that the turkey can air dry overnight.

STEP 4: Roast the turkey

Take the turkey out about 1 hour before you want to start roasting it so it can get rid of the chill. You can stuff it at this point, too, if you are planning to cook the stuffing in the bird. Heat the oven to 425° F. Place the turkey in the roasting pan on a rack in the bottom third of the oven. No need to cover with tinfoil. Roast at this temperature for 30 minutes and then reduce the heat to 325° F. Roast for about another 2 hours until an instant-read thermometer reads 170° F at the thickest part of a thigh. Baste the turkey with its juices or a little bit of melted butter for the last 30 minutes to get it nice and golden.

STEP 5: Let the bird rest, the sequel

Take the turkey out of the oven and let it rest for 30 minutes to let the juices settle (covering it in foil at this point helps keep it warm). Remove the stuffing, if using, and carve away!

June 21, 2010

Harvest!

Ok, so this isn't my very first harvest, but rather a late spring/early summer harvest coming in the middle of a relentless streak of rain and cold weather in June (!). And on (and possibly through) June 21 (!!!!) to boot.

Now I love fall and, being a Southern California girl, get very excited about the first snow - I love cozy weather where it makes sense to drink tea and eat cake, curled up in front of a movie - maybe one you wanted to see and never got around to or one you'd never even heard of before you saw it at the rental store or on iTunes. But on the summer solstice? Really?


That, my friends, is a picture of the sky in Munich right now (a color photograph, mind you), at around 3:30 in the afternoon (not sometime after dusk) during a time of year and in a part of the world where the sun doesn't set until almost 9:30 p.m. or even later.


So when my friend V., with whom I am renting out garden space from the city of Munich, stopped by in the pouring rain yesterday with two heads of lettuce, some spring onions, two different kinds of radishes, some late spinach fresh from our garden and a lot of mud on her shoes, I was definitely impressed. That's dedication!


And just the right amount of fresh color to brighten up a gloomy day. So tonight, we will dine like queens (and kings, of course) on abundant salad and grilled onions. Maybe with a cup of soup (protest! I want light, refreshing summer food!) on the side to help keep us warm.

And in the meantime, Laughter will kick it on the heater.


P.S. With that said, I've heard there is hope and that the gloom might flee these parts by Wednesday, making way for some real summer days. As they say, hope springs eternal, or, as they say in German, die Hoffnung stirbt zuletzt.

P.S. Next time I'll include a recipe. Promise!

June 7, 2010

When in doubt, boil an egg

One of the most difficult meals of the day for me is lunch. For some reason, I always seem to have a hard time coming up with something nutritious, tasty and filling between the hours of 12 and 2, especially if I will be eating alone. And this is bad. Because if I don't eat, I become one of two things -  a raging beast who is willing to eat practically everything in sight or a woozy slug who can barely make it to the door. So what to do?

Well, I know, I know, a sandwich is always good, and I'm trying, but I can't really seem to find the inspiration for layering things on top of each other between bread when my energy level is at its lowest.

What about soup, you say. Yes, soup is a very good idea and something that I often crave during the noontime hours. The only problem with soup is that I have a hard time mustering up the patience to go through the soup-making process when I am so hungry I could eat my cat (something, I'm sure, he often thinks about me as well. I mean, let's face it, deep down in their hearts even house cats are ferocious, carnivorous beasts - we're just too big to eat). If I happen to have soup, left over and ready to go, great. If not, no soup.

This is a situation, by the way, that I hope to change in the near future. Lunch every day, rain or shine, on my own or in the company of others...

But for now, what is the grand, over-reaching, mother of all solutions? Well today it's an egg.

The egg...


Hard-boiled, plain and simple, no fuss, no frills.


Chop it up and add some dijon mustard, a little bit of pepper, green onion tops, a sliced radish fresh from the garden, some tasty bread and there you go.


And this little protein bomb in a shell can be eaten with all sorts of things or just plain naked with some salt and pepper. So, when in doubt, at least for now, a hard-boiled egg can save the day.


Hard-boiled egg life-saving lunch

1 or 2 hard-boiled eggs, depending on how hungry you are, preferably still piping hot from the stove*
A dollop of dijon mustard (or more if you want a real kick)
pepper to taste
1 green onion top, chopped (I usually just snip it with scissors)
1 small radish, sliced

After you are done hard-boiling your egg (cook it for about 10 minutes in boiling water), run it quickly under some cold water so you don't burn your fingers and peel it. Then, chop it up into rough, "rustic" chunks, add a dollop of mustard and mush/stir it together a little with a fork - just enough to spread the mustard around. Garnish with the green onion on top and add the sliced radish on the side. Break out the bread and enjoy!

*eating the egg nice and hot gives the yolk a creaminess when mixed with the mustard that you just can't get from cold egg yolks


You can take the humble, freshly hard-boiled egg and make it into a simple meal by adding all sorts of ingredients. I'm thinking sliced prosciutto, tomatoes and basil or, maybe next time, goat cheese.

June 1, 2010

Impromptu carbonara cure

It's rainy here in Munich.

And cold.

I'm not sure if someone forgot to read a memo somewhere, but it's June 1st! And it's not just the fact that I'm from California and have a different internal thermometer (yes, still, even after 10 years - lows of 41? What?) Everyone here seems to be longing for sunny days. One of the things I love most about living in Munich are the seasons. But today, June 1st? Brrrrrr.... Still, I suppose it's good for the grass seeds we sowed on the weekend.


And for the other plants that finally got repotted or put in the planter where they get to stretch their legs a bit.


So what's a girl to do on a day like this? Well, after going for a run during the only relatively rain-free patch of the day (only four more weeks to go until I do my very first half marathon ever, gulp), C. and I made pasta. Spaghetti carbonara to be exact. No rules, no recipes. We just kind of threw it all together. C. is becoming a whiz at sauces and almost anything to do with noodles, which is nice because that means a lot of potential dinners! Dinners where I can enjoy being treated to someone else's talents and let my creative juices stew for other endeavors.

And it was amazing...


I cut up two smallish onions, while C. got the water boiling.


I also cut up the ham and grated some parmesan.


There were the onions, and the ham of course, and eggs and then there was the cream. I love you, cream!


Although this isn't exactly a one-pot wonder, it's pretty close. Once you have the onions nice and translucent, you add the pasta, then the ham, the cream and then, finally, the eggs. Salt and pepper to taste, add some parmesan and you're golden. And so is this dish.


We sat down to a delicious, creamy, smooth pasta with a slight crunch from the onions and a salty kick from the ham. I am starting to think that cream makes anything work (i.e., delicious). Every noodle was covered with a delicate coating of cream, cheese and egg. So good. The rain started up again outside and I could feel a cloak of coziness wrap around me. It's still there. And now I think I'll go make a cup of tea.

Cheers!


Spaghetti carbonara improv

serves 2

enough spaghetti noodles for 2 people (about a fist-full)
1 1/2 tablespoons olive oil
75 grams prosciutto or other salty ham, sliced (if necessary) and cut into squares - I used Schwarzwälder ham here... I'll get to that another time
2 smallish onions
2 eggs
150 grams heavy cream
a small pile of parmesan
salt and pepper to taste

Start a pot of water boiling for your pasta. Don't forget to salt it! While the pasta is cooking, heat the olive oil in a skillet for about a minute and then add the onions. Cook the onions over medium heat until translucent and somewhat brown around the edges. Drain the pasta and add it to the skillet. Add the ham and stir to combine. Next, pour in the cream and stir some more to coat the noodles. Let simmer for about a minute. Crack two eggs on top and mix those in as well. Each strand of pasta should be completely coated by now. Cook for 30 seconds or so to give the egg some time to set. Add the parmesan and salt and pepper. Serve immediately.

You can garnish this dish with chopped parsley, chives or any other green, leafy edible herb you can find around the kitchen. The green color gives the dish a freshness and ties it all together.


January 31, 2010

An explanation


Ok. This is my first time blogging. It's not my first time writing, but it's my first time writing about food. Not only is this a chance to engage in dialog about something I'm really interested in - food, cooking it and eating in - it's also a chance to put myself out there and maybe chisel away at some of the constraints I put on myself when I sit down to tackle a project. I set standards. A good thing. But they can get in the way. It's not like everything I produce has to be worthy of Nietsche or Inger Christensen (she is so amazing!). That attitude will get me nowhere, which I'm sure is very obvious to everyone. But for some reason it is a logic that I still need to grasp myself. It all starts here.

And I could take a lesson from my cat, Laughter. Everything he does he does with total passion and without thinking. Ok, so he has a very, very small brain. But still. He's a constant presence in my kitchen because food is the one thing he is most passionate about in life. And he works for it. He doesn't give up, even when there is no hope of success in sight.

I could learn from that. Just like I hope to learn by writing this blog. A blank canvas for whatever I cook or think or explore. And hopefully some pictures of Munich, the Isar and more. I can't wait!